

Many of my photographs on this website are digitally edited.
I mostly use the free program GIMP.
If you don’t want to spend money on Photoshop etc, GIMP might be the right choice for you.
In this case I would like to help you with some tutorials.
In my opinion step by step tutorials are very frustrating, because you will learn a lot of stuff that doesn’t match with what you actually want to do. It takes long until you can actually start with your own project and in the beginning there is no final product you are looking forward to. That’s why I decided to do something different. In each part of this tutorial I will show you one of my photographs before and after the edit and describe what I did and how. This way you can pick out what you need and directly apply it to your own photographs.
WARNING:
Older xfc-documents can not be opened with newer versions of GIMP. (I learned this the hard way.)
These simple options will solve the problem:
- Don’t ever save your images in the GIMP-format (.xcf) but export them as .png etc. Or:
- Don’t ever update your GIMP version.
I recommend to choose option 1. 😉
Let’s get started:
01 – Lively Colors, Blurred Background and Hiding Things in the Shadow:
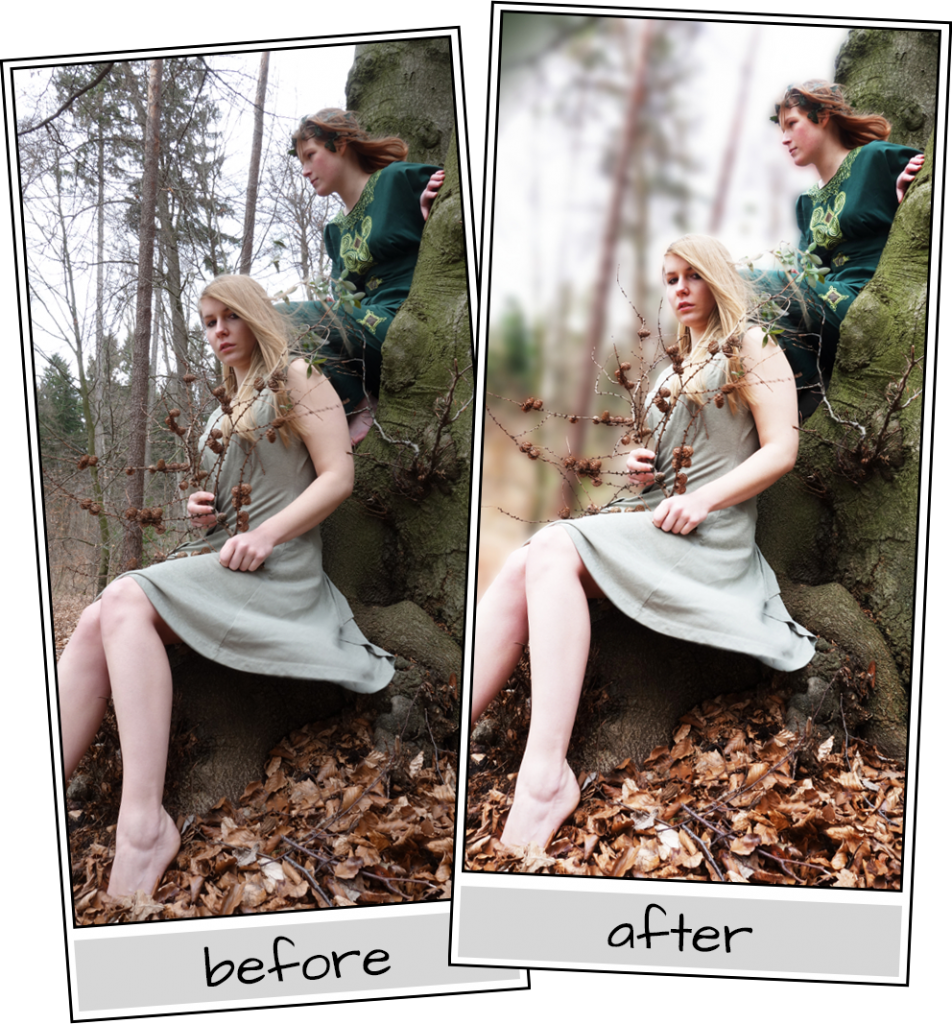
The lively colors:
- Choose “Colors” -> “Curves” from the top. Within the new window activate the “preview” function. Now choose two points on the diagonal you see and bring the line into a flat s-curve. Try around until you like the result.
The blurred background:
- Select the background of your photograph [1] by using the “free select tool” from the tool bar. Don’t try to keep the left mouse button pressed and draw the line, but click your way step by step. (Unless you use a drawing tablet.)
- Create a new document [2] with the same size as your photograph. Choose “Layer” -> “Delete Layer” from the top to get a transparent background.
- Copy and paste the selected area from [1] into the new document [2].
- Go back to your starting image [1] choose “select” -> “invert” from the top.
- Copy and paste the now selected foreground in another new document [3] also with transparent background.
- Go back to [2] use “filter” -> “blur” from the top (repeat this as oftan as you want, the blur increases each time)
- Paste the background [2] and the foreground [3] back into the original picture [1]
Parts that are supposed to hide in the shadow (the foot of the red haired elve)
- Select the area by using the “free select tool”
- Choose “colors” -> “Brightness-Contrast”. Within the new window activate “preview”. Now decrease the brightness. (also repeatable) Don’t change the contrast.
Done 😀
Have fun.
It was realy helpfull 😀
Didn’t expect that you did the DOF with GIMP and in the post production 😀
Looks realy real to me o:
Thank you. Pleased to hear this did help. 🙂